
I’ll say that the form Roller gear is slipping off the track. I notice it’s when the vibrating roller shifts to the near side mostly. The only thing I have noticed is the first form Roller L shaped hinge is loose turning and has to be checked and turned back. There doesn’t seem to be anything to tighten it. I tried lowering the geared form Roller but had no effect.
I’m sure it’s something simple, but it’s not coming to me.
Here is a short video. I have a slightly longer one if that would be helpful.
Here are the pictures I mentioned in my last comment.
UPDATE: I had the chattering problem again twice in the print session. Although we had done maintenance which consisted of : 1. The end screws did not have set screws in them. 2. But loosening the set screw on the core (it was hard! Used a soldering iron to warm up the metal and vise grips to turn the Allen wrenches) allowed the end screw to come off. 3. The woodruff key was present. 4.-5. Everything got cleaned and oiled. The threads were in good condition. 6. The bearing assembly was cleaned. 7. After D went back inside I located a tool for taking the lock screw off the bearing assembly! ( Because he got to do all the fun stuff)
8. I used this to switch out front form roller one with the loose L-bracket, scavenged a lock screw from another and installed it.
I am sharing another video here. What I am questioning is whether the gear is supposed to shift back and forth like this, and would it be enough to send the roller down the track while skipping the the correct teeth.
FINAL UPDATE:
I have been able to print again with no problems. It took me a while to get back on the Vandercook because of some other projects. We resolved an issue with heat in the shop in the meantime. This all started when it was pretty cold and the water heater needed some maintenance to run well. Clawhammer Press and Bowerbox Press both thought it could be the cold, and Clawhammer added that ink could be the issue. Extra tacky, cold ink (especially if it sat overnight-EVEN with anti-skin spray) can introduce friction between the form rollers and the ink drum, just enough to lift them or jump and get off track. So with a warm shop and fresh ink, things are running much more smoothly.
I still think my form rollers move a bit more than they should laterally, which could be wear. I am very glad that I learned more maintenance on the rollers, nevertheless.
See update to original post. Not solved quite yet.
The end screws should tighten all the way into the core.
– loosen the set screw inside the end screw before tightening
– clean and oil the interior threads on the core. If needed use a 3/8-24 thread chaser
– examine the threads on the screw and the interior threads on the core.
If needed use a 3/8-24 thread cutting die on the screw and a tap inside the core.
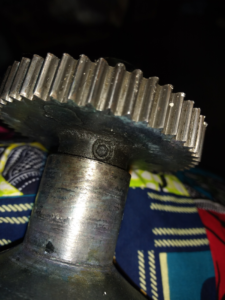
I also have your book and a manual from NA Graphics, and I have them at hand. Your book says “Form Roller Gears-fixed on both form roller cores. Correct roller height ensures gear and gear rack mesh properly.” Now I have a problem with turning the knob on that back roller gear to adjust the height. It is very difficult to turn either way. Maybe its really off.
I am showing a picture of what I think is the set screw on the collar, which I was not able to budge, so its tight. I can also see the collar and gear are one piece. How does loosening the set screw move anything? Does the collar slide into the roller?
I am also showing a video of the roller bearer wiggling on the core. Is this supposed to happen? Are the journal screws the same as the end screw on pg 20 of your book? Should I tighten these?
I actually have extra bearing assembly parts, so maybe I can switch out one that has a better L bracket.
The first thing to check is that the woodruff key is present. This is a semi-circular disc that aligns the gear and the roller core. Loosen the set screw on the collar and slide the gear toward the core end to reveal the key or the channel in the core. If missing a 1/8 x 1/2 Woodruff key can be purchased at a hardware store. Clean the channel and insert the key. Sand to fit. Retighten the set screw on the gear collar.
Your cores also have sleeves with set screws. See the attached images.
Check that the journal screws on the end of the roller cores are tight against the roller bearings and the cores.
L shaped hinge: theses brackets can have a little bit of play so that they lay flat against the lift arms, but you can add silicone to increase the drag. Also check that the bearings tight in the ring of the bearing block. Here you can use Loctite. Replacement bearings blocks may be available from NA Graphics.