
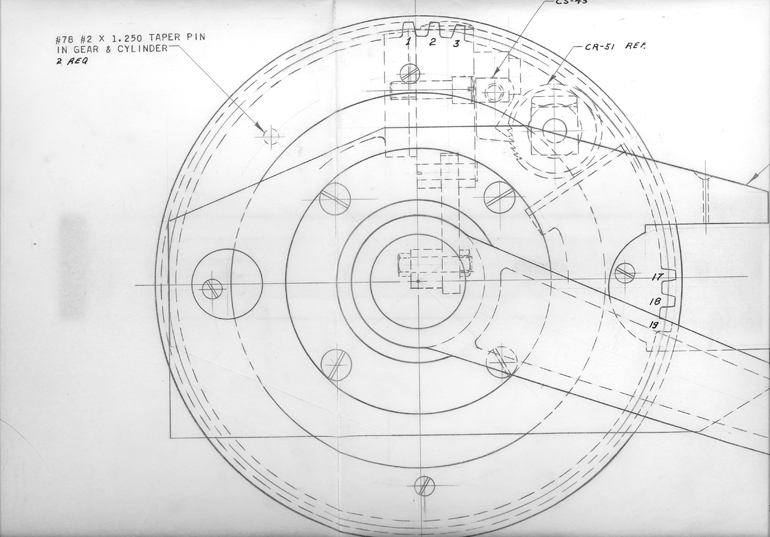
Fritz sent me this drawing of a No.4 cylinder showing its position at the feed board. It is posted for the benefit of Klu, and other tenacious individuals who dare to restore long-abandoned presses from which lesser mortals would have walked away. –PM
The excerpt below was originally posted 10-11-06 by Paul Moxon on “PPL”:http://groups.yahoo.com/group/PPLetterpress in response to klu’s request for guidance in replacing the cylinder on a No.4. It is posted here for archive purposes:
Reinstalling a Cylinder on a No.4
Remove the gripper clamp bar from the cylinder.
Reinstall the two short sections of gear rack on each side of the bed.Set the carriage back onto the bed and allow the cavity of the cylinder to face up. This is where it wants to balance itself.
Look at the storage cabinet beneath: The cylinder gear and rack is on the cusp of engaging when the carriage is centered over the left wall of the tall bin (middle storagespace). Now gently slide the carriage to this position, but stop just before engagement.
Hold the carriage firm but rotate the cylinder toward the feed board until the surface where the clamp bar mounts is almost 180 degrees facing down. Move the carriage unto the rack and slowly roll it back to the feed board.
The cylinder is correct when the gripper clamp bar mounting surface is 90 degrees. On your first attempt the cylinder will probably lean foward (toward the bed) meaning you are only a tooth or two off. If so so the carriage forward off the gear rack and try again. Patience.
Also: the best position to install or completely remove the gripper clamp bar is when the mounting surface is 180 degrees facing up as this does not stress the mounting screws.
I should point out that this a portion of a larger print, but its purpose was to show the proper alignment of the handle at the start position. The handle on each press has a taper pin holding it in place. And each hole was drilled for each specific press with the handle positioned prior to drilling–to pre-drill and have the taper holes align properly is probably not possible. That’s why the couple of times we’ve tried to fit a handle to a press it didn’t belong to that we had considerable reaming and filing to get a pin to work. But this print also shows the start position for the gripper bar, and counting teeth on the gear, one can determine where the cylinder should fit on the bed rack. Or, trial and error, depending on one’s level of patience.
yowza! sounds like a real doozie.
i read your directions, and re-read it. i think i can do it! i’ll be sure to recruit more muscles, and let you know how this pans out.
thanks for all your help (and Fritz too) – klu